Showing posts with label Barbarian. Show all posts

Tuesday, December 19, 2023

Medieval Raider (Workshop Figure)

 At the beginning of this month I attended a workshop with Ivan Hortal in the bay area. It was a 2-day class where we worked on this bust sculpted by Lucas Pina Penichet (Spira Mirabilis). It was a fantastic class and I learned a lot on painting textures as well as some nuances of light placement that I will definitely be using in my future work. I (and most of the class) painted the majority of the bust during those two days. I was very happy with the progress and, since he was almost done, I wanted to complete the figure at home.


Here's a look at the piece after the class. I had done a little more work on the hair the night I got home, but otherwise this is what I finished during the class.


And here is the piece after more work at home.

I painted the leather belts and redid the NMM. I really liked the approach to NMM taught in the class, I just spent a little more time refining those parts and adding a little more ambient and reflected color. On the skin I painted the neck and made some tweaks to the face (reflection under the nose, redoing the area under the eyes, adding some light reflection on the lips, some glazing, some highlight adjustment, etc.). I also worked on the chest, adding a little more hair texture and then using glazes to develop the shadows and add a little more color nuance. I wanted to add a bit of weathering on the shirt, so I add some small flecks of dirt. Finally, on the fur cloak I worked more on the highlights and did a little more ambient color glazing on the right, shadow side.

I'm extremely pleased with the end result. Here are a few additional views of the final piece.


Wednesday, February 22, 2017

Planning

I'm in the process of trying to finish up some other projects.  Did a little work in the past few days on the Dragoon Officer, did some sketching on the Deaths Head Hussar bust, and of course I need to get back to the Celt.  We've got the SCAHMS show coming up in a month and a half, so I'd like to get at least two of those three projects finished so I can bring them to the show.  Progress has been minimal, but when I get a little more done I will share some photos here.

In the meantime, I've started to plan out a future project.  Black Sun Miniatures just put up a new centaur figure for pre-order.  The sculptor, Joaquin Palacios, also recently did a centaur for Terrible Kids Stuff, but I happen to like the Black Sun one better.  The kit actually comes in two versions, one with an elf rider and one without.  I'm happy they're offering both versions as I just wasn't that big a fan of the elf.  Anyway, I just pre-ordered the centaur and started to think what I want to do with it.  The figure has a great action pose, rearing up with a spear ready to strike.  It's a cool figure by itself, but the pose is just crying out to be paired with another figure for a duel-type scene.  I looked through a lot of companies that carry 75mm figures, considering both fantasy figures, historical knights (which can be used for fantasy), and Greek figures (for more of a mythological setting).  I came up with several possible options, but I think the best may be the Barbarian from Scale75.  Using photoshop and images I grabbed from online, I put together some rough mock ups on how I think these figures will look together.  Here's what I came up with...

Another top contender is Leonidas (also from Scale75).  My main issue with that piece is the figure is essentially naked (except for a cape, helmet, and greaves).  I'd want to sculpt on some clothing/armor if I were to use him.  I could either keep him as a Greek warrior, and go with a mythological theme, or replace the head as well and use him as a knight/warrior for a fantasy piece.  Since I'm not too confident in my sculpting abilities (even if just for conversion), I'm still leaning towards the barbarian... but perhaps I'll change my mind.

I thought about adding another warrior to the mix, but couldn't quite find a figure to fit.  A friend on one of the forums suggesting a non-fighter figure like a woman or a child.  I like this idea as it takes a neat looking duel scene and adds some stakes to the outcome.  Is the barbarian trying to rescue the girl?  If so, will he succeed?  Or perhaps the centaur is her protector and the barbarian the aggressor.  Will she be safe?  Switching it up and having the barbarian be the bad guy would be interesting.  Of course, since the centaur is larger, the barbarian seems like the underdog.  In which case, perhaps I should stick with him as the good guy.

I started to look around for a figure that might work in the non-fighter role.  El Viejo Dragon has a lot of female figures in 75mm, but none seemed quite right.  Plus, most are naked and I'd probably want to sculpt on at least some clothes.  I looked at some other companies and I think my best bet may be this fairy figure from Aradia Miniatures:
I'd probably ditch the wings (easy enough to do).  I could treat her as a human or maybe a fantasy creature like a dryad, naiad, nymph, etc.  I could portray that with coloring (non-human flesh tones) and/or conversions like horns/antlers, replacing the lower legs with those of a faun, etc.  What I pick will influence the story.  As a human, it's implied she's on the barbarian's side and he's rescuing her.  As a fantasy creature, perhaps the centaur is her guardian instead.  Another option is the Fallen Angel figure I just finished.  The one I did was 54mm, but Milosh has a 75mm version too.  As with the fairy, I could leave off the wings and make her a regular human or convert into a fantasy creature too.  Her pose works best for captive.

So, lots of text and not so much painting, but I just wanted to share my thought process and hopefully wet your appetites for this upcoming project.  As always, it will be interesting to see how similar or different the end result will be to these early plans.  Probably won't actually start this for a couple months (don't think the centaur will ship till late March and I've got other stuff on my plate).  But I'd love to get this done in time for next year's Crystal Brush, so I do want to get going on this before too long!

As a final thought, when it comes to creating a scene, sometimes that can come together organically as you go.  That's what happened to me with the hobbit piece.  I started with just the figure holding a lantern and the rest just sort of happened.  In this case, what I want multiple figures to look like they are interacting, I think it helps to plan beforehand.  That way I can start to build the base and get the figures positioned convincingly.  That doesn't mean things won't evolve as I go, but in this instance I want to start with more of the scene figured out.

Wednesday, January 4, 2017

Celt Part 2

I'm a bit slow in posting the update here, sorry!  I've made some decent progress on the Celt.  Since last time I've been working on the body, mostly the front of his torso and one of the arms.  Haven't had many long painting sessions due the family obligations and the holidays, so easier to work in small chunks I can actually finish in a short sitting.  The back and other arm still need work, but I'll get there.  As with the face, I'm placing spot highlights in places to try to give him a satin-like finish.  One of the keys to these that I've found are making sure you are consistent with how you're placing them.  In this case, I imagine the light is above but slightly to his left.  So the reflection point on each shape has to match that location for the light.  Easy to forget if you're not careful and I've had to make a few corrections as I go where things aren't quite matching up.


I thought I'd show a side by side progression on the face.  The first image is the work from last time.  The middle image has the hair added in and details like the lips (skin shadow + red, then skin highlight added in).  The final image looks similar, but has subtle variations added with glazes.  There's red in the cheeks, on the tip of the nose, and bottom of the ears.  I did a very subtle blue glaze on the chin and jaw to hint at stubble (but didn't want to overdo that).  It takes more layers for the glazes to show up against this darker skin (as opposed the light skin I normally paint), but that can be addressed.  In the end, I was happy keeping it subtle because that felt right for this subject (rather than exaggerated red on the nose/cheeks).  But more layers of glaze would have increased the color had I wanted to.


Tuesday, November 15, 2016

Celt Part 1

I'm still hopping from project to project.  A while back I agreed to do a figure exchange with a friend.  I didn't want to take forever to finish (or even start) this, so I'm putting my personal projects on hold for a bit to make some progress on this guy.

The figure we chose was a 70mm Celt from Art Girona.  It's a neat sculpt, though the casting leaves something to be desired.  A bunch of pitting that I had to fix.  I've got a couple figures from Art Girona and they've all had one issue or another.  I like some of their sculpts, but the quality of the casting on the ones I've received means I probably won't buy from them again.

Anyway, this is a cool sculpt of a barbarian holding a severed head, presumably a Roman's head.  I gave the figure a quick base coat and then started shading and highlighting the face.  I wanted to try a different skin mix than I typically use.  I thought this would work better for a barbarian.  Instead of my normal base of Rosy Shadow, I used a 50/50 mix of Rosy Shadow and Bronzed Shadow.  For the shadows I used a 60/40 mix of Chestnut Brown and Basic Dirt along with maybe 10% of the base color.  For the deepest shadows I added some Walnut Brown.  The highlights were a 50/50 mix of Fair Skin and Bronzed Highlight, then some Pure White for the final shine on the skin.


Here's a close up of the face.  I included another face I did with my old skin mix for comparison.  I'm not done with this new face yet, will probably make a few tweaks and then apply a number of glazes.  But I like how the new mix looks.  I'll definitely keep it as an option for future projects.

Wednesday, March 23, 2016

Samurai Part 14 and a few other announcements

With about a week left until Crystal Brush, I've just about finished the samurai... at least the figure itself.  I've still got to paint the shoes and touch up the arrow heads in the quiver, but the figure is essentially finished.  The base is another matter.  It's been built, but the painting is just beginning.  I'm a bit stressed out by how little time there is to finish it, but I'll find some way to get it done to a level I'm happy with.  I'm going to save the truly finished photos for after the Crystal Brush, so these will be the last ones I post for another week and a half.

I've also put the finishing touches on the Northumbrian.  Like the samurai, I'm saving the final pictures for after the show... but I thought I'd still post something.  Here's a look at the figure from the back.  You can see the final weathering on the shield (including the scratches added to the metallic parts) and the snow effects on the base.

In other news, I wanted to remind everyone that there is an online voting component for the Crystal Brush.  Half the score is decided by the onsite judges and half by online votes over at CoolMiniOrNot.  You have to have an account there to vote, but it's free to create one.  Voting will take place Saturday, April 2nd (starting around 3 pm central time) and Sunday, April 3rd (ending at noon central time).  There should be a lot of amazing figures up in the gallery.  Artists like Ben Komets, Kirill Kanaev, Karol Rudyk, Aaron Lovejoy, Jessica Rich, and many others will be submitting entries.  Voting is the normal 1-10 scale, so take a look and rate the pieces what you think they deserve.

Finally, for anyone in or near the Southern California area, our local modeling club is putting on a show next month.  Come check it out!  There are categories for historical as well as sci-fi and fantasy figures.  Judging is on the open or merit system, so you're competing against a standard rather than against each other.  So even if you're not a pro, your work can still be recognized!

Thursday, March 17, 2016

Northumbrian Part 8

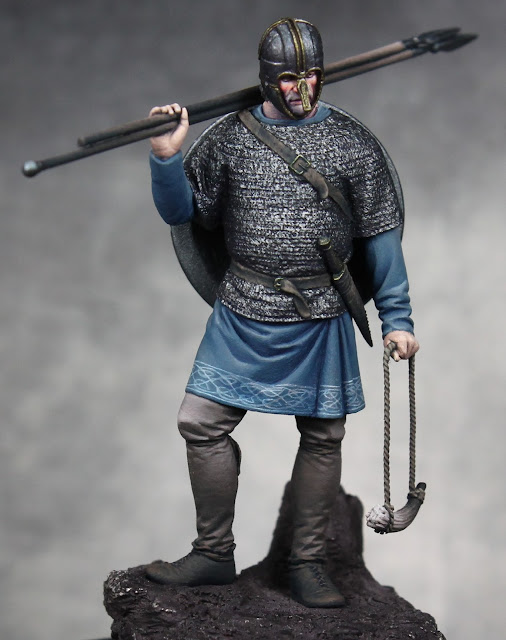
Been pretty quite here this month.  I've been fighting off a cold and was away from home last weekend.  Hopefully this weekend will be nice and quiet and I can try to finish up the samurai figure.  In the meantime, I decided to do a little work on the Northumbrian.  I haven't touched this guy since September, but I'm planning to use his as my entry for Historical Single Figure at the Crystal Brush competition so I need to get him wrapped up.  All I've got left to do on this one is paint the base and do a few final touches (weathering) to the figure.

I took the base that came with the figure and extended the groundwork out to the edges of the wood plinth.  I used the same colors from the figure (browns, grays, and blues) to paint the base so it kept the muted feel of the rest of the piece.  I plan on making this a winter snow covered scene, so I did not worry too much about the dirt.  I still needed to paint it and the rocks since, until I actually put down the snow, I'm not sure what might show through.  I probably spent the most time on the tree stump as that will definitely be above the snow.  I also added some dead leaves and yellow grass.  I'll use some pigments on the grass so it's not all so one note with the color.  Again, most of that will be covered by snow, but some may stick through and make the scene look more interesting.

I want to do a little more painting on the shield and then weather the figure (and base) with pigments.  Once that's done I'll go about adding the snow.


Thursday, September 17, 2015

Northumbrian Part 7

Just a little bit of progress to share.  I did some minor tweaks to the horn and rope.  I also applied some glazes to the hands.  A bit of pink to warm up the knuckles and the right palm, then some bluish purple to cool down the shadows.


I think I've finally settled on a shield design that I'm happy with.  Thanks to a suggestion from Maenas over at CMoN, I'm doing the celtic pattern radially on the shield.  This will add that extra detail I was looking for without fighting against the existing pattern on the shield.  I haven't decided if I'll do it on all the dark sections.  I'm going to start with four and see how it looks, then decide whether or not to do the rest.
 When I finish the design, I'll do some glazing to blend it in and reinforce the shadows.  After that I'll add chipping and general weathering to the shield.

With this figure almost finished, it's time to start prepping the next project.  I've gone back and forth a lot on what I want to use as my 'big' project for Crystal Brush, but right now I'm leaning heavily towards a 90mm samurai archer from Pegaso.  It's a beautiful piece with a lot of opportunities to work with freehand designs and plenty of color.  This will definitely be a multi stage project.  I've assembly most of the body but, because of the design work I'll have to do on the clothing, most of the armor panels will need to be attached later.  There's also a bunch of equipment that will go on over those (sword, quiver, etc) but that will have to wait until after I do the detailing on the armor.  Definitely a big project and one that has a lot of potential, but also one that is going to take a lot of time.  I'd love to get in done in time for the contest but no promises yet.  We'll see how it goes.  Anyway, here's a look at the figure partially assembled.  I included the Northumbrian for a sense of scale.  It's definitely a big jump going from 54mm to 90mm.


Quick update on the shield...


Sunday, September 13, 2015

Northumbrian Part 6

Made a bit more progress on the Northumbrian figure.  I finished up some detailing on his legs (the straps and shoes.  Then I turned to the shield.  Last time I'd only roughed in the basic colors.  Now I've cleaned up and shaded the alternating blue sections.  I had this whole thing planned out... but now I'm starting to rethink that.  My original idea was to do a white circular design on top of the alternating blue sections.  It would be similar to the one on the tunic, but ending in a pair of serpent or dragon heads (based on the helmet metal work).  However, now I'm starting to worry if the shield will be too busy with that design there.  I'd still like to do something... but I'm not sure what.

So, while I weight my options, I decided to add the final piece to the figure, the horn in his left hand.  This was a piece from my bits box that I thought would be an interesting addition to this scene.  Once I make a decision on the shield, I'll finish that up and then start weathering the figure before finally getting started on the winter base.

\

Monday, September 7, 2015

Northumbrian Part 5

After finishing up his tunic, I turned to his accessories.  I was still undecided on my plan for the shield, so I started with his spears.  I wanted to do a dull brown, so the shadow is a mix of Ritterlich Blue and Brown Liner.  Then the midtone is a mix of Basic Dirt and Dusky Skin to take it into more of a brown grey.  The highlight is that mixed with Vampiric Shadow.  Since they're basically just horizontal cylinders the normal shading isn't that interesting.  So I put in a gradient getting lighter towards the tips for a little more interest.

The hands were next.  As with the face I mixed in a bit of Ritterlich Blue to the Chestnut Brown and Rosy Shadow mix.  Normally I'd go from there up to pure Rosy Shadow and then mix in Fair Skin for the highlight.  In this case, I went to maybe 70/30 Rosy Shadow and Chestnut Brown (+ blue) and then started to mix in Fair Skin.  I wanted to keep the hands a bit paler and not as pink.  I still need to go in with glazes, but these I'll keep to purple and blue.

I approached the pants the same way as the tunic.  I used a lot of the same colors to help tie it all together.  The shadow tones are 50/50 Brown Liner and Ritterlich Blue (which has been used in numerous places).  The midtone is 50/25/25 Basic Dirt, Dark Elf Skin, and Heather Blue.  The highlight is 50/50 Vampiric Skin and Dark Elf Highlight with just a touch of Basic Dirt mixed in.

I did base coat the shield, but nothing beyond that.  I decided to do the alternating sections in light and dark blues (rather than introducing a new color).  On top of that I will do some sort of design too.  The outer section of the shield and the middle will be metal, I've just laid down a dark blue to work over.  Jason Martin has been working on the same figure and posted a nice shield step by step, so I'm planning to refer to that as I go.


Sunday, August 23, 2015

Northumbrian Part 4

I finished up the border pattern on the tunic and painted the leather belts.  With that finished I was able to add his other equipment (minus the war horn).  Those pieces are just base coated at this point, but they will be the next things I work on.  I'm debating what I want to do for the shield color.  I've base coated the metal parts with Ritterlich Blue.  But the center section will have one main color or perhaps two with alternating sections.  I'll then go over that with another design based on the helmet.  So I'll probably work on other parts while I try to figure out my plans for the shield.

Here's a close up of how the pattern developed.  I started with the two border lines, measuring as I went to keep the spacing consistent.  I then went and added a bunch of guide dots (again measuring the keep the spacing consistent).  Now, I get on to doing the actual design.  By building it up in several stages, it will be easier to create a uniform looking pattern.  The first stage is a series of arrows or sideways v's going around the tunic.

Next I loop the ends of the v's around to form two leaf shapes.  Then I extend the base out to form more of an x.  And the final stage is to add the outside loops to connect up all the lines.  I was using a couple different colors as I went to give it some light-dark contrast.  But after the final stage I went in with some glazes to further develop the shadows and tie it all together.

Thursday, August 13, 2015

Northumbrian Part 3

I spent the past two evenings working on the tunic for the Northumbrian figure.  I opted for a blue fabric to fit the cold theme for the piece.  Normally I'd pair blue with something like a dark burgundy wine to create more interesting shadows.... but that would warm them up more than I want.  So instead I stuck with just a regular dark blue, Reaper's Ritterlich Blue, for the shadows.  The midtone and highlight was a mix of Heather Blue and Dark Elf Highlight (2 parts blue to 1 part dark elf or maybe 3 parts blue to 2 parts dark elf).  I also mixed in a bit of Ghost White for the top highlights.  This was used more on the upper part of the figure than the lower.

You'll notice the armor on his back is very very dark and dull.  The shield will eventually be placed on his back, so all of that area will be in shadow.

If you're wondering what's going on with the dots, they are guide marks for the border pattern I'm creating.  I began with a thin line along the bottom edge.  I then marked the height of the pattern on a stick and used that to place marks so the spacing on the top line will be even.  There's a lot more to the pattern, so it will take some time to finish.  My plan is to use the pattern from the nose guard of the Coppergate helmet (which this figure's helmet is based on) and adapt that to create the pattern for the tunic.  I'll also be using the design work on the helmet as inspiration for the shield design.