Showing posts with label Enigma. Show all posts

Wednesday, December 26, 2018

2018 Year in Review

Well, it seems like a good time to look back at all my painting related work from the past year. This year included a move to a new city, which provided a bit of a disruption from my normal hobby work. Unfortunately my new hobby space is a bit more isolated, so I'm still trying to find the balance between work, family, and painting. Of course we'll be moving to a new place (same city though) in another 3 or so months... so perhaps that setup will end up working a bit better for me. :)

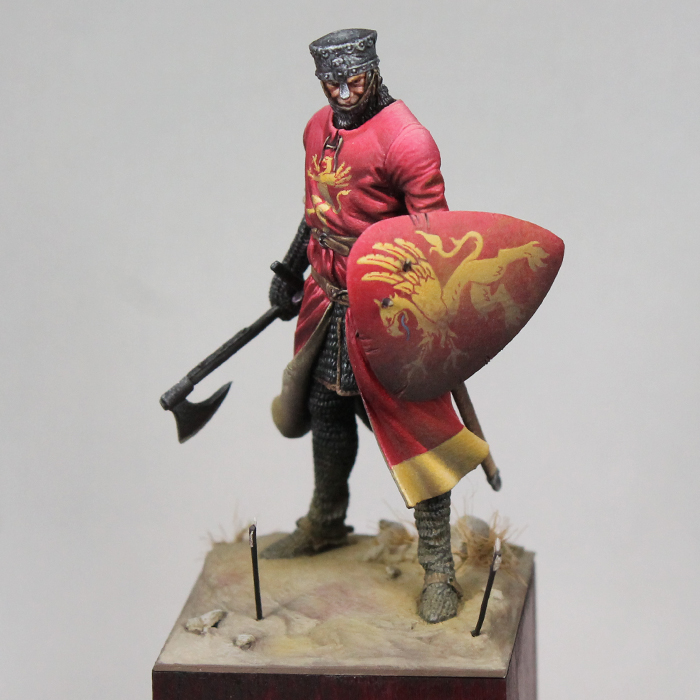
There's been quite a bit of painting though, because I've got some bigger projects in the works, it hasn't resulted in that many 'finished' pieces.  Only three pieces were fully completed this year: a 28mm White Speaker (commission project), a 54mm Knight of the Third Crusade, and a 54mm dwarf (Brom from Enigma miniatures).  The White Speaker, like this post, was a trip down memory lane.  Several years ago I painted the 54mm version of that figure, so it was an interesting project to see how, with more experience, closely I could replicate that work at half the size.

The knight was a really enjoyable project.  I'd had my eye on the kit for a while.  It's a pretty simple figure from Romeo Models, but there was something about it that just stood out to me.  There was plenty of room for interpretation and personalization with the color scheme and iconography.  The piece was also a great project to work on my metallics and my freehand.  It ended up being the subject for two articles in the Illustrated Historical Artist (one on freehand and the other on TMM) and won first place in 'Eavier Metal's 'Eadbanger competition (Master Single Figure category).

The final completed piece was Brom.  I'd wanted to do a relatively quick fantasy project, so I picked up this old 54mm Engima figure from a friend.  As usual, my 'quick' project turned into something much more involved... but it was a piece I definitely enjoyed working on.  The sculpt is pretty unusual.  The figure is wearing a hodge podge of cobbled together armor, much of it corroded.  That, along with the pose, pushed me to come up with a narrative for the figure long before I even started painting.  Although I wanted to keep this a single figure scene, I still worked to tell a story with the piece.  I actually have another article in the works describing that process, though it will likely end up posted online on the FigureMentors site as opposed to in a magazine.  So be sure to keep an eye out for it! ;)

In addition to my finished pieces, I've got a number of projects in various states of completion.  The largest of them is the 3 figure fantasy pirate diorama I've been painting for quite some time. Two of the figures, Barbarela Lord of Mussels and Redghar, were pieces I started in 2015 and 2016! I've had this idea of combining the dwarf with some other pieces, so it's been something that's evolved over time.  Between then and now, I ended up repainting most of the dwarf.  My skills had improved and the orc was noticeably better than the dwarf.  So he needed updating in order to work together.  Those two figures are essentially finished and the third, a monkey, is nearly complete as well.  The base is still under construction (though that's nearing completion), but painting the scene will still be a significant undertaking.  I'd like to take this with me to the Crystal Brush competition, so hopefully I can get it wrapped up in the next couple months!

Another big project was the 75mm Tiefling figure based on Critical Role's Mollymauk. This started out as the Child Thief (aka Peter Pan) from Terrible Kids Stuff. While a neat piece, it never inspired me as much as I wanted it to. But, when I decided to create a figure based on one of the Critical Role characters, it seemed like an ideal piece to convert. So I redid a lot of the detail on the outfit and added the horns and tailed needed to turn him into a tiefling.  It was my biggest conversion by a large margin, but only the beginning of the project.  The character is covered head to toe in design work, so there's been a ton of freehand that's gone into this project.  Still more to do, though he does appear to be nearing completion.  I've got a base already planned for him (thankfully not as complex as the pirate scene).  But it also needs to be built and painted.  I'd like to also get this piece done in time for Adepticon/Crystal Brush, so lots to do and not much time to waste!

In addition to all of those, I've worked on a 28mm figure of Vax (also a Critical Role character) released as a special edition.  It's almost finished.  Just a little work left on the wings and then a small display base to build and paint.

I also worked on a 54mm gladiator from Pegaso.  This was a kit that I've liked for quite some time, but was a bit intimidated by all the armor.  After painting the knight (shown above), I felt a lot more comfortable with my approach to TMM and decided to give the gladiator a go.  While the main figure is mostly finished, I felt he needed another figure to complete the scene.  I picked up a fallen gladiator from El Viejo Dragon, but so far have only base coated him.  Since there's no specific contest I have planned for this piece, it's taken a back seat to some other projects.  But I do hope to return and finish it up shortly after the Crystal Brush.

And finally I did some early work on a 75mm Napoleonic Trumpeteer. Pretty much just focused on the face, so he's in the very early stages.

Aside from the painting projects, I've joined up with a new painting group in San Jose (at the Game Kastle in Mountain View).  They're a great group of painters and have quite a few people who are focusing on display painting (and larger scale pieces) and pushing themselves to improve their abilities.  It's definitely been a highlight to get to interact and paint with them on a weekly basis.

Looking ahead to 2019, I've made plans to attend Adepticon after missing the last two years.  I'll be teaching two workshops on painting faces and skin plus a demonstration for freehand.  A little closer to home, I'll be repeating the faces and skin class at KublaCon in the bay area.  I've also got a weekend workshop at Game Kastle planned for July, though we are still working on the details.

All in all, it's been a productive and fun 2018.  And I'm definitely looking forward to what 2019 has to bring.  I should be able to finish off a number of big projects and I can't wait to get back to teaching some classes!  I hope all of your 2018s were just as memorable.  And I look forward to seeing what projects everyone else will be working on in the coming year.

Wednesday, November 28, 2018

Brom Part 8 1/2

I'm working on an article about this piece for FigureMentors in which I'll describe in detail how I approached the piece and attempted to let the character's story guide me.  In that I'll discuss how I built the base, but I wanted to share a few pictures of the process here...

After coming up with the concept, I roughed out the shape of the base using cork.  The cork is torn, not cut, to create the rocky shapes.  I used some sculpting tools to break off pieces too, carving out the recess in the front.  The figure was set on the base at this time to see how it all looked in relation.

I then began constructing the bridge.  I started with the main posts and support ropes.

From there, I created the planks from balsa wood.  I used an x-acto knife to carve up the edges and make them look more like old wood planks.

With the bridge finished, I started to flush out the ground details.  I used a modeling compound (a bag of powder stuff you mix with water from the art store) to smooth out the soil surface.  At this point I also added a number of real stones.  That way they were submerged in the soil and not simply resting on top.  The modeling compound doesn't have a lot of grip, so when it had dried, I applied a layer of 'Super Thin' superglue over it.  This helped to lock them into place, without adding thickness (obscuring detail) like a gap filling superglue might.  That is the shiny look you can see in the picture.

To provide some further texture, I used sand.  Taking some white glue and an old brush, I applied glue to various areas on the top and sides of the base.  I then sprinkled sand over these.  This gives more of a rocky texture (the actual rocks are more like large stones, while the sand are small rocks) and helps to hide the look of the bare cork on the sides.  When dry, I used more of the super thin superglue to help hold the sand in place (as it can be knocked off more easily if only white glue is used).

The base was then primed and layers of brown were applied.  This is still early in the painting stages, but you can see how all the above materials look with some color.

Lots more painting followed, along with the final addition of grass, arrows, and of course the figure.

Monday, November 26, 2018

Brom Part 8

I managed to finish Brom with a few hours to spare before the FLGS contest deadline!  I added some grass to the base.  The figure's color scheme is primarily orange and green (with jut a hint of purple), so I wanted to introduce some green into the base too.  I glued him to the base and used putty to make the ground meet his feet, which then had to be painted to match the existing base work.  I also painted his feet right around that time.

With that done, all I had left was to put on the final details.  Arrows were added to the base and I applied the rest of the blood effects on the figure and base.  Here's the end result...


And one last picture for a sense of scale...


Tuesday, November 20, 2018

Brom Part 7

This project has been neglected for quite some time.  But, we've got a contest at our local game store (Game Kastle) coming up next week, so I decided to finish him up so I could enter.  The main figure was mostly finished.  He still needs his feet painted and some final weathering, but nothing major.  The base, however, still needed a lot of work and that is where I've focused my attention.  When it comes to painting the figure, I usually have a clearer vision.  But bases tend to be more experimentation and reworking things until I'm happy (or at least happy enough to move on).

Here's a look at the last image I posted of the base. 


From there, I lightened up the center of the soil.  This is the path, so I wanted a lighter color for it.  It also functions to guide the viewer toward the figure.  The rocks needed painting of course.  For those, I went with a light grey.  The result was fine, though a bit boring.  So I went over them with glazes of brown and green.  Not everywhere, just to darken shadows, bring up some greens on the sides of select rocks, etc.  I also applied a mix of Linen White and matte medium to create some bird droppings, so give the rocks some history and a touch of realism.  For the wood portions, I wanted an old faded look.  So I went mostly grey.  I used Walnut Brown as the shadow, then Dusky Skin as the base (a brown-grey), and finally Weathered Wood (from Secret Weapon) for the top highlights.


The base is pretty close.  I've got a little bit of painting left to do on the ropes.  After that, I'll add some grass and other details on the sides (leaving the center path clear).  The figure still needs to be fixed to the base, so I'll fill in some gaps around his feet at the point and paint them to match the existing groundwork.

There will be some final details added after that.  Some blood, perhaps some dust with pigments, arrows into the ground, etc.  I've only got until Monday to get it in for the contest.  So we'll see how much I'm able to do before then!

Monday, June 4, 2018

Brom Part 6

After finishing the knight, I turned to another small project to see if I could finish it off too.  Brom, the 1/35 scale dwarf, was meant to be a quick project.  As usual, things got a bit more complicated as I began painting.  Still, he's not nearly as involved as others, so I'm hoping I can get him wrapped up by the end of the month (before we move!).

Since last time, I attached his hands and the club and then started to paint the rest of his arms.  I also took on the back of the character, painting the heavily weathered armor along with some other details.  Here's a quick look at the figure.  I'm hoping another one or two painting sessions and I'll have him mostly complete (aside from some final weathering).

As I'm nearing the end of the figure, I turned my attention back to the base. I had previously built the broken bridge and placed cork to form the rough shape of the ground.  But the build was certainly not finished. I'm trying to keep the base simple so the focus can stay on the figure and the broken bridge. So instead of trying to add a sign or some other structure, I just wanted to have a rock and dirt base.  The idea being this was the end of the path up to the bridge.  I'll probably add some grass after painting, but I'll leave the base mostly uncovered.

To finish the build, I placed some larger stones (some from putty and others just actual rocks) and glued them down.  Then I took a modeling compound (it's white powder-like stuff that you add water to and then it forms a paste for modeling) and created the dirt shape on top of the cork.  Into that, I set more of the small stones (and some sand).  When the compound dried it held onto the stones a little, but the bond was not strong enough.  So I took some thin super glue and dropped a bit on top of the rocks.  This soaked into the base and formed a nice strong bond.  I used some white glue and added some more sand over top for texture.  Again, the bond was not that strong, so I used more of that thin super glue to really lock the sand in place.  After that, I primed and began to paint the base.  I've got the basic dirt color and am starting on the rocks, bridge, and rope.


Monday, April 2, 2018

Brom Part 5

Getting back to Brom, I moved on to his clothing.  This was an area that I struggled coming up with a color for.  I decided to go with an orange-green-purple palette, which is not a typical choice for me.  But the orange hair and rust and then the green verdigris pushed me in that direction.  Still not much purple, aside from some undertones, but I plan to work a bit more of that in in a few spots.  I made a couple aborted attempts at the cloth on his right arm before I settled on a color I liked.  I initially thought green plus some brown or grey, but that kept looking too bright and vibrant.  In end then, I went more with brown plus some green (maybe 3 parts brown to 1 part green).  This gave the subtle effect I wanted.  I then continued that onto the cloth around his waist. Afterward, I did some of the fur bits and the leather around his left arm.


I still need to do the back of his armor.  What you're seeing here is just some of the undercoat.  I started with purple and then started to lay down rust tones.  Normally I don't worry too much about how clean the undercoat is, I just want some color there.  But in this case, since so much of the metal is rusted away, I won't be covering up nearly as much with the metallic.  So I'm planning to put a bit more work into the rust now so I don't have to do quite as much once the metallic goes on.


Normally I try to assemble as much of the figure as I can before painting.  This guy doesn't have a lot of parts, but I opted to leave the hands/weapon off.  The main reason was the cloth and details around his waist.  I'm sure I could have managed if it were just cloth, but there's a rope and a tiny skull dangling from his front.  With the hands/weapon there it would have been very difficult to work on those finer details. Plus the connection between his arms and hands is good, so I don't foresee any gaps or issues there.  The only thing I still want to do before attaching the hands is base coat the inside of them.  You can see the fingers on his left hand are mostly blocked by the body, same for the back of his right hand.  But, depending on the angle, you can still see them a bit.  So, it'll be easier to lay down some initial dark coats/shadows there before attaching.  Then I'll paint the rest.  In the meantime, here's a peak at how he's going to look.

Monday, March 26, 2018

Brom Part 4


Working on some weathering at the moment. I decided to try something a little different this time. On the recent metals I've done, I've started with undercoats of different colors (black, purple, brown, and rust).  Then I've stippled on the metals.  The undercoat shows through in spots and creates some subtle effects.  However, in this case I planned on doing a very corroded metal.  So I decided to start with some pre-weathering.  I laid down a dark purple base and then applied rust and veridgris shades. After that was done, I applied the metal through stippling.  I tried to let those undertones show through, especially at cracks or crevices. You can see these first two stages below.

Then I went back over with the rust and verdigris shades and did another round of weathering.  I covered up most of the metal.  I also went to the brightest shades of the rust and verdigris colors I've got (the Secret Weapon Miniatures weathering acrylics).  In the end, was the pre-weathering necessary?  I'm not sure.  I like to think those undertones helped build up an effect, create more a history, blah blah blah.  But hard to say for sure.

Just a little view showing the inside of the left pauldron.  Put a mottled pattern of rust with some metal still showing through here and there.  Mostly this is to show the armor on his back.  One of the difficulties with this sculpt is figuring out what some of the things are supposed to be (or at least what they could possibly be).  The box art only shows the front of the figure, so hard to tell what Latorre did with this section.  It feels a little like the material on his forearms... but not quite.  After chatting with a friend, I'm leaning towards treating it as extremely corroded metal.  There are some rivets down the center and a detail at the top which would fit with a piece of metal.  Plus, it's a piece covering his upper body, so armor/metal makes sense.  It's the best interpretation I've come up with, so unless something else comes to mind, that's what I'll be doing with it.