Tuesday, January 18, 2022

Frank Von Stein - Part 2

Unlike the last project, this is a project I began in the past year and actually managed to finish it too! I was taken with this version of Frankenstein's monster from Terrible Kids Stuff as soon as I saw it. I liked the weird world war take on this classic monster character.


My goal with the project was to stick with a limited, desaturated palette. While I didn't want to simply paint him in black and white, I did want to bring to mind the look of those old monster movies with a limited use of color. Also, as Frankenstein seems to be associated with the color green, I worked a bit of desaturated green into all of my color mixes for the piece. It's not as obvious to my eyes when I look at the entire piece, but if I put it next to a neutral grey then the color shift is more apparent to me.


This piece also gave me another opportunity to make use of the 3D printer for basing. I didn't sculpt any of the background, but I created the basic plinth and wedge for the wall behind the figure. Then I took wall and floor textures from files I got through Print and Play Minis Deathburg kickstarter, clipped, and merged them in Blender to create the primary scene. The box came from Keta Minies kickstarter, also clipped to fit the scene. And the rats came from a recent release from Loot Studios (also clipped from a larger piece). I then added the electric cables using two different sized pieces of wire.


Here's a closer look at the skin. I really enjoyed experimenting with unnatural skin tones on this figure. You can check my first post on this figure to see the details of the color mix I used on the skin.


Onitsukaji Part 3 - Completed

I recently returned to this project from 2019. I was really happy with the start on this orc but got bogged down in painting the sash around his waist. Seems like a silly thing to get stuck on, especially since you can barely see it in most of the views below. But I found trying to paint the sculpted on texture to be a pain and it took away a lot of the joy from painting the piece.


But, I was looking for a project to use in a Secret Santa mini exchange and decided this would be a great subject. Plus I could use the extra motivation to get me through my painters block on this figure and actually finish him! 


After painting the figure, I took advantage of a 3D printer I'd picked up a little over a year ago to print out a few props for the base. While I've used it for a number of figures, I also really value the ability to resize and print scenery objects to fit whatever scale figure I'm working on. It's given me a lot more freedom to come up with more details for the scenes I'm creating.


Thursday, September 30, 2021

Frank von Stein Part 1

 It's been quite a while since I've updated this blog. I haven't been too productive over the past two years. But I'm hoping to get back to painting on a more regular basis and ideally will get back to sharing my projects here too.


As we're approaching Halloween, I decided to work on the 75mm Frank von Stein from Terrible Kids Stuff. I began this project back in March and did the initial shading and highlighting on the skin and pants. Now that I've returned to the project I made some adjustments (highlights on his upper body weren't quite right and needed to be rebalanced) and then went in with glazes to add color variation and bring the skin to life as it were. Some subtle red glazes around the sutures, implants, and in the cheeks. Some purple glazes around the veins. And finally a little bit of blue glazing in select shadows.


The skin tone was based in AK's Grey Green. I added a 50/50 mix of AK's Basalt Grey and Reaper's Walnut Brown to that for the shadows (with Black added to anywhere which needed to be even darker). Highlights were done by adding AK's Green Grey to their Grey Green (yeah, not the most helpful names). And final highlights were done with Reaper's Linen White.


I'm working in the Grey Green and Green Gray into just about every mix used on the piece (including the metallics) to give the entire piece a green shift.


Thursday, November 7, 2019

Jester [Critical Role] Part 2

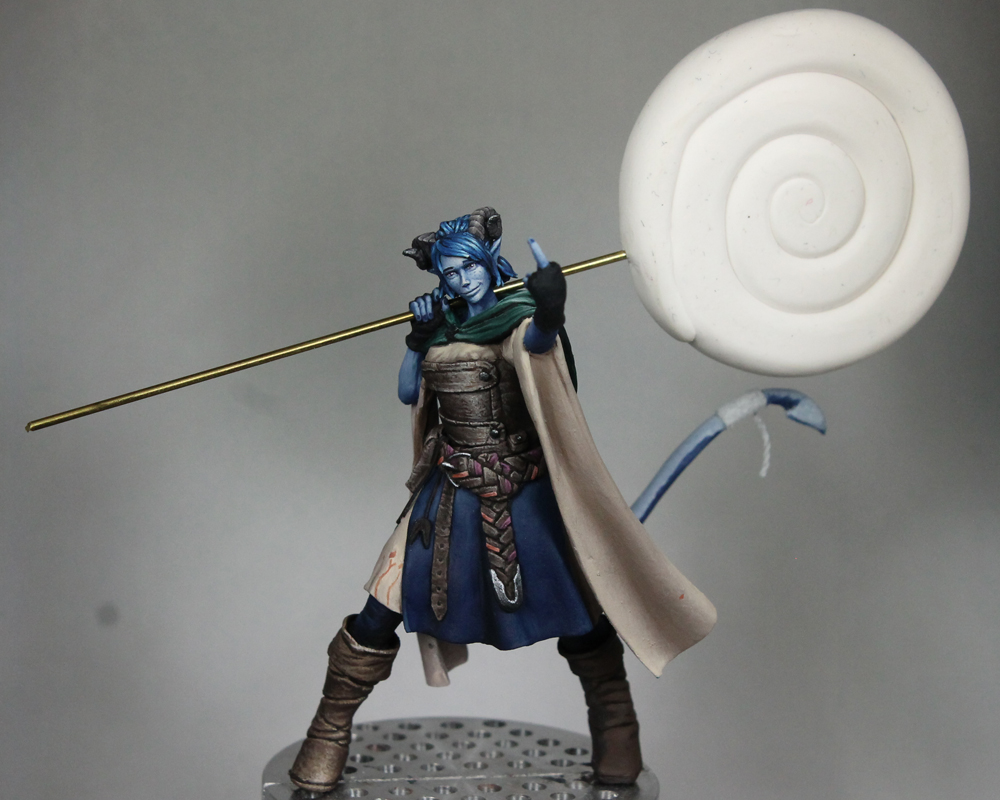
A while back I posted about my process converted this 75mm figure into Jester from Critical Role. Now I'd like to share with you the painting I've done on her so far.

She's got light blue skin, but from the concept art it looked to be a bit warmer in the shadows. So I used a 50/50 mix of Reaper's Void Blue and Violet Light to start. Then I worked up to Snow Shadow and finally added in some Vampiric Skin (for an off white highlight). The hair is more of a standard blue, so I used Void Blue, shaded with Black, and then added Vampiric Shadow for the shine spots.

For the cloth I used a 50/50 mix of Dusky Skin and Basic Dirt (for that brown-grey off white) and just a touch of orange rust. Then Dusky Skin Highlight and Bronzed Skin (2:1) and finally Bronzed Highlight and Linen White (3:2).

The leather bits are Walnut Brown, Basic Dirt, and Khaki Highlight. While the boots are Walnut Brown, Basic Dirt, Driftwood Brown, and Vampiric Shadow to offset them a bit.


And, as a reminder, here's a look at the painted piece next to the bare conversion. I made plenty of mistakes during the conversion process since I'm still learning. Some I corrected then, others I'm attempting to correct as I paint (texturing sections like leather is a great way to hide issues with the underlying sculpt btw 😉)


Friday, October 25, 2019

Female Orc Part 3


Taking a break from all that blue, I decided to work on a few other parts of this figure. The non-metal covering on her looks to be of two types. Ones smoother and one has jagged edges (and stitches between sections), so I opted for two colors/materials. The jagged section is painted to look a bit more like raw hide while the smoother sections are treated as regular leather. I also started to work a bit on the hair, though there is still more to do. I wanted the hair to be mostly black, with a shock of white. Black hair can be tricky. Once you start to highlight it, the hair can quickly start to look like grey hair instead of black. I've dealt with this on a few pieces (the fallen angel and the dragoon) by painting a shine/reflection onto the hair. I feel like it successfully implies glossy black hair, so that's the approach I've used here as well.

There are a couple tricks with this approach. First, think about how the light would reflect off the hair. Don't simply place the shine at the topmost part (like you would with regular zenithal shading). Imagine the location of your light source and what angle the shine might appear if you viewed the figure from the front (the light reflection depends on both the position of the light source and the viewer). The other trick is making a quick transition from white (or near white) to black. You can see a full discussion of how I do that in this tutorial. In short, I begin with a sketch using 4 or so colors. I want to rough in the reflection which then allows me to see how it looks (is the placement right, how's the size, etc). I then do my traditional layering but this time working from light to dark. Start at the brightest spot and then blend outward to black. I like to maintain a gradient of color on my palette as it's easy to goof up the blend. When that happens, I can go back and grab an intermediate shade(s) and redo the transition. Eventually I get to a place I'm happy with, like below. At the moment I'm trying to decide if the reflection extends too far up and down. Perhaps it should be narrower? I might go back with some glazes and try to reduce the size a bit if I decide that is needed.


And here's another close up showing the latest work. You can click on the image to see the full resolution version in case you want an even closer look!


Monday, October 21, 2019

Female Orc Part 2 and Thoughts on Light

I've made some more progress with the skin and based a lot of her clothing. Here's a quick look at my latest progress.


One of the areas I wanted to work on with this figure was my use of ambient light. The general idea is how does light bouncing off the environment show up on the figure? In some sense, we all include this without thinking about it. Basic zenithal lighting (or the stop sign rule for the historical painters) has you transition from lightest at the top (or surfaces facing the light source) to darkest at the bottom (or surfaces away from the light source). If we actually excluded all of the ambient light and only had the single direct light source, every surface pointed away from the light source would be completely black. Instead we gradually transition to our darkest shade and even surfaces angled away from the primary light have some light hitting them (bounce light from the environment).

What I want to work on is using that light to convey more information about the environment and by that I mean color! Assume the surrounding environment is primarily one color (yellow for a desert, green for a field or forest, etc). That color light would be reflected back at the figure and tint the shaded regions. For this piece, I plan to have her over a primarily red base, so that will be my ambient color.

One important question to ask is how does ambient light differ from OSL? Strictly speaking, ambient light is a form of OSL in my opinion. Light is bouncing off the environment and hitting the figure. Thus the environment is my light source. However, unlike OSL from a lantern, the source is not concentrated but distributed over the entire ground. So it should be treated more like a directional light (up from below) rather than a point light source. We likely also want to approach the fall off and intensity a bit differently from typical OSL. With traditional OSL, we want that light to be dramatic! So you probably have a strong intensity near the source and then all that to quickly fall off with distance. For ambient light, the source is probably far more subtle (it's just reflected light, the ground is not generating its own light). And thus the fall off should be more gradual (or subtle) too. Now, let's say the primary light source is very strong and the environment is reflective/shiny. In that case, quite a bit of light might be reflected and thus you would have a stronger intensity to the ambient light. That is of course a special case, but I wanted to point it out as you should consider what you're painting and how it might affect the 'rules' rather than just blindly following them.

Below is a close up of the back of the orc (where you will see most of the ambient light at the moment). I'd say it's somewhat exaggerated, but I didn't want to go too subtle and not be able to tell it was there. Besides, the skin could be a bit reflective (satin finish) and thus pick up a bit more light. Still, I think the light is not too strong. You can compare that to the more intense OSL I used on the orc bust. Also a light from below, but meant to imply a source generating light rather than just a reflected light.


Tuesday, October 15, 2019

Female Orc Part 1

I decided to take another try at an old project. I got this 75mm scale female orc from GT Studio Creations. It's a bit of a different take on the subject and I liked the sculpt. It's also (hopefully) a straightforward project as there's just a few materials to work with (skin, leather, and metal). I actually first started painting her about a year and a half ago, but I got stuck. I had a basic vision for the piece but had trouble figure out exactly how I wanted to do the blue skin. I started on her and then changed my mind, painting over my previous work. I did this a couple times and the piece, especially the face, started to get over worked. It was turning into a mess so I abandoned the project.

Lately I've been looking for something fun to paint. There are a couple areas I want to work on, so I wanted a figure that would let me explore those topics. But I also wanted something that wasn't too complicated. I didn't want a project where I felt I'd likely get bogged down halfway through. After a bunch of indecisiveness, I decided to give this orc another shot. Since it was already in danger of having too much paint built up on it, I decided to just strip my old work and start fresh.

I'm sticking with my earlier vision, just not second guessing myself with the color mixes. For the skin I'm using a 3:2 mix of Void Blue and Violet Red. From there I transition to a 2:1 mix of Void Blue and Snow Shadow. From there I transition up to pure Snow Shadow and then some Vampiric Highlight for the brightest spots.

I want to play around with light on this figure. My main interest is playing with ambient or bounce lighting. This was something covered by Roman Lappat in a class I took with him at NOVA Open and I want to get in some practice. For this piece I plan to have a base that's mostly red. So that's why I'm adding Violet Red into the shadows. As I move down the figure and closer to the base, I plan to have the reflected red become more apparent. Of less importance, I wanted to work with a brighter main light as well. Recently I've fallen to using some rather dull off whites for my main highlights. I feel like it's creating the sensation of an overcast day. For this piece I switched to Vampiric Highlight (a nearly white highlight) just to switch things up a bit.


And here's a close up of the face. You can click on the image for the full resolution version. I like sharing these close ups from time to time as I think they're helpful in seeing what's actually going on with the brush strokes and blending.