Showing posts with label Napoleonic. Show all posts

Wednesday, December 26, 2018

2018 Year in Review

Well, it seems like a good time to look back at all my painting related work from the past year. This year included a move to a new city, which provided a bit of a disruption from my normal hobby work. Unfortunately my new hobby space is a bit more isolated, so I'm still trying to find the balance between work, family, and painting. Of course we'll be moving to a new place (same city though) in another 3 or so months... so perhaps that setup will end up working a bit better for me. :)

There's been quite a bit of painting though, because I've got some bigger projects in the works, it hasn't resulted in that many 'finished' pieces.  Only three pieces were fully completed this year: a 28mm White Speaker (commission project), a 54mm Knight of the Third Crusade, and a 54mm dwarf (Brom from Enigma miniatures).  The White Speaker, like this post, was a trip down memory lane.  Several years ago I painted the 54mm version of that figure, so it was an interesting project to see how, with more experience, closely I could replicate that work at half the size.

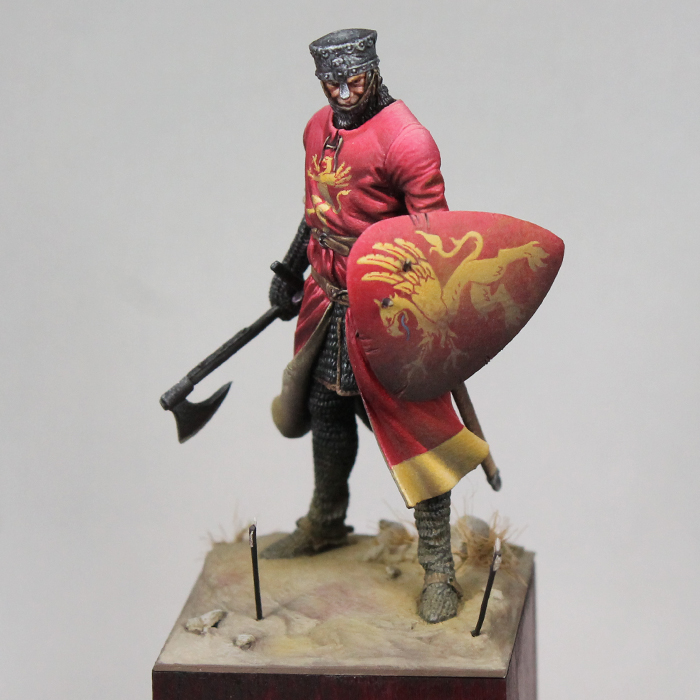
The knight was a really enjoyable project.  I'd had my eye on the kit for a while.  It's a pretty simple figure from Romeo Models, but there was something about it that just stood out to me.  There was plenty of room for interpretation and personalization with the color scheme and iconography.  The piece was also a great project to work on my metallics and my freehand.  It ended up being the subject for two articles in the Illustrated Historical Artist (one on freehand and the other on TMM) and won first place in 'Eavier Metal's 'Eadbanger competition (Master Single Figure category).

The final completed piece was Brom.  I'd wanted to do a relatively quick fantasy project, so I picked up this old 54mm Engima figure from a friend.  As usual, my 'quick' project turned into something much more involved... but it was a piece I definitely enjoyed working on.  The sculpt is pretty unusual.  The figure is wearing a hodge podge of cobbled together armor, much of it corroded.  That, along with the pose, pushed me to come up with a narrative for the figure long before I even started painting.  Although I wanted to keep this a single figure scene, I still worked to tell a story with the piece.  I actually have another article in the works describing that process, though it will likely end up posted online on the FigureMentors site as opposed to in a magazine.  So be sure to keep an eye out for it! ;)

In addition to my finished pieces, I've got a number of projects in various states of completion.  The largest of them is the 3 figure fantasy pirate diorama I've been painting for quite some time. Two of the figures, Barbarela Lord of Mussels and Redghar, were pieces I started in 2015 and 2016! I've had this idea of combining the dwarf with some other pieces, so it's been something that's evolved over time.  Between then and now, I ended up repainting most of the dwarf.  My skills had improved and the orc was noticeably better than the dwarf.  So he needed updating in order to work together.  Those two figures are essentially finished and the third, a monkey, is nearly complete as well.  The base is still under construction (though that's nearing completion), but painting the scene will still be a significant undertaking.  I'd like to take this with me to the Crystal Brush competition, so hopefully I can get it wrapped up in the next couple months!

Another big project was the 75mm Tiefling figure based on Critical Role's Mollymauk. This started out as the Child Thief (aka Peter Pan) from Terrible Kids Stuff. While a neat piece, it never inspired me as much as I wanted it to. But, when I decided to create a figure based on one of the Critical Role characters, it seemed like an ideal piece to convert. So I redid a lot of the detail on the outfit and added the horns and tailed needed to turn him into a tiefling.  It was my biggest conversion by a large margin, but only the beginning of the project.  The character is covered head to toe in design work, so there's been a ton of freehand that's gone into this project.  Still more to do, though he does appear to be nearing completion.  I've got a base already planned for him (thankfully not as complex as the pirate scene).  But it also needs to be built and painted.  I'd like to also get this piece done in time for Adepticon/Crystal Brush, so lots to do and not much time to waste!

In addition to all of those, I've worked on a 28mm figure of Vax (also a Critical Role character) released as a special edition.  It's almost finished.  Just a little work left on the wings and then a small display base to build and paint.

I also worked on a 54mm gladiator from Pegaso.  This was a kit that I've liked for quite some time, but was a bit intimidated by all the armor.  After painting the knight (shown above), I felt a lot more comfortable with my approach to TMM and decided to give the gladiator a go.  While the main figure is mostly finished, I felt he needed another figure to complete the scene.  I picked up a fallen gladiator from El Viejo Dragon, but so far have only base coated him.  Since there's no specific contest I have planned for this piece, it's taken a back seat to some other projects.  But I do hope to return and finish it up shortly after the Crystal Brush.

And finally I did some early work on a 75mm Napoleonic Trumpeteer. Pretty much just focused on the face, so he's in the very early stages.

Aside from the painting projects, I've joined up with a new painting group in San Jose (at the Game Kastle in Mountain View).  They're a great group of painters and have quite a few people who are focusing on display painting (and larger scale pieces) and pushing themselves to improve their abilities.  It's definitely been a highlight to get to interact and paint with them on a weekly basis.

Looking ahead to 2019, I've made plans to attend Adepticon after missing the last two years.  I'll be teaching two workshops on painting faces and skin plus a demonstration for freehand.  A little closer to home, I'll be repeating the faces and skin class at KublaCon in the bay area.  I've also got a weekend workshop at Game Kastle planned for July, though we are still working on the details.

All in all, it's been a productive and fun 2018.  And I'm definitely looking forward to what 2019 has to bring.  I should be able to finish off a number of big projects and I can't wait to get back to teaching some classes!  I hope all of your 2018s were just as memorable.  And I look forward to seeing what projects everyone else will be working on in the coming year.

Sunday, November 4, 2018

Trumpeteer Major Part 1

Well, it's been a while since I've updated this blog.  I haven't had as much time to paint as I'd like and, when I had the time, it seemed like I wasn't making enough progress on anything to make it worth posting.  I think I've been in a painting funk for a bit.  Got a bunch of projects, but some just aren't inspiring me at the moment and others seem stuck, where I might know what I want to do but just can't quite figure out how to do it.  I spent some time thinking, trying to figure my way out of the funk.  I came to the conclusion that the best thing was to just start a new project.  Something without any big plans or complicated ideas, just something I could have fun with and recharge my painting mojo.

I settled on a 75mm Napoleonic figure from Pegaso.  Historicals are comfortable for me and I love the colors and details on Napoleonic pieces.  This won't exactly be an 'easy' figure.  The colors are primarily white, red, and metallic gold lace.  But looking ahead, I don't see a part of the project where I anticipate getting stuck if that makes sense.

I built and primed him on Saturday.  Got about an hour of painting in that night to do the base coating and initial shadow sketch.  Then had another couple hours on Sunday while the little on napped to try and finish the face.  Also on my mind is my upcoming workshops at Adepticon.  I'll be teaching a two sessions of a class on faces and skin.  So while I was working on this figure, I took pictures are each step along the way.  I'm planning to put together a handout for the class to supplement my demo and lecture.  So I expect I'll use this figure as part of that write up.  Anyway, here s how he began (basecoat only) and how the face wound up.

Something I've discussed in tutorials and will include in the class is the use of glazes to finish the work on faces and skin.  It's a subtle step, yet I think it really helps capture a more realistic look.  So I like to show these side by sides.  On the left, the face after all of the shading/highlighting.  It looks fine, but compare it with the image on the right (after glazes) and I think you'll agree the right looks much more life-like.

Friday, April 14, 2017

Empress' Dragoons Officer Part 7

And the piece is finally finished!

Since my last post, I worked to finish off the column.  I focused on the front side first before turning to the back.


 The rear was done just like the front, working on 4 or 5 stones at a time.  It was a relief to finally be done with all of them!!!  After that I laid down some basic dirt brown shades for the ground.  I tried to keep it light.  I wanted it to look like dry earth, not dark mud.

I also took care of the sign on the front of the column.  I applied a few subtle shades of dark grey to the gate to give it a little variation (though nothing major).  Then I added a bit of grass and some dead leaves to break up the ground work.  A few pigments here and there on the ground and base of the column, and the scene was complete!

The final step was the add the sword and scabbard for the dragoon.  The scabbard was painted in black, like the boots, and metallics for the fittings.  The cloth bit wrapped around the handle was done just like the yellow-gold details on the uniform.

Here's how the final result looked.  All in all, a fun project and one I'm happy with.


Wednesday, March 15, 2017

Empress' Dragoons Officer Part 6

The base is coming along brick by brick.  Makes me wish I'd picked a simpler setting for him but too late now!

Monday, March 13, 2017

Empress' Dragoons Officer Part 5

I finally had the time to sit back down and finish off the Dragoon's left boot.  Here's a quick close up of the finished boots next to the sketched in ones.  In case you missed my last post, the tutorial on how I did them has been posted here.


That means the figure is essentially finished.  The only thing to add to him is the sword (which he'll be holding in his left had).  The bottom of the scabbard will be resting on the ground while the handle will be in his hand, so I wanted to wait until he was ready to go on the base before I permanently attached it.  That will actually be a bit tricky.  I've got to get the attachment right at both ends.  Then there are the straps which will go around his leg and attach where they disappear beneath his coat.  I'll have to bend and adjust these so they look right.  If I'm not careful, it'll be easy to scratch up the existing paint job on the figure.  It's all stuff I should be able to handle, but it will need to be done with some care.

In the meantime, I need to paint that base.  I started on that the other day.  I gave the gate a dark base coat (it will be wrought iron) and then applied several different shades of grey as base coats for the stones in the column.  I plan to make this using light grey/white stones, but I want to have some variation in there.  Right now it's a bit extreme, but as I continue to paint and highlight each one, I think the end result will look subtler.  So far I've just painted a few, but I need to keep moving along if I want to get this done in time for the SCAHMS show!


Monday, March 6, 2017

Empress' Dragoons Officer Part 4

Taking advantage of the painting time and getting as much done on the Dragoon as I can.  I cleaned up the gold lace/cord and did the rest of the cords and epaulets.  This was done with Burgundy Wine, Muddy Brown, Palomino Gold, Buckskin Pale, Linen White, and Pure White.  I then took care of some small details (the last of the horse hair on the top of his helmet and the medal on his chest) and then I turned my attention to the boots.  Like the horse hair, I wanted a shiny black look for the boots.  I'm putting together a detailed tutorial which will be posted over on FigureMentors (though I'll share the announcement/link here as soon as it's up).  In the meantime, here's a quick look at how I painted them.  As you'll notice, I only completed one of the two boots.  The blending is a time consuming process, so I find it easier to just focus on one at a time.  I'll hopefully take care of the other boot later this week.

First, I began with a sketch of where I want the highlights

Then I start the slowly blend them back down into the black.  I start with the lightest shades and gradually get darker and darker.  Here's a look at that partially done.  The image on the right has been blended from Vampiric Shadow (an off white) to Dark Elf Highlight and then to Dark Elf Skin.

From there the blending continues, going from Dark Elf Skin to Dark Elf Shadow.  A little Pure Black was used in some shadows, but most of what appears to be black is just the Dark Elf Shadow.

Finally, I went back in with some Vampiric Highlight and then Pure White to add some extra pop to the reflection points.  You can see the comparison below between the previous blend (on the left) and the one with the brighter reflections on the right.  I also made a few tweaks so some of the blends (like on the top of the foot) while I was at it.

I've written up a much more thorough discussion of how I did these and how I approach shiny black in general.  I hope to get it posted in the next few days, so check back for an update with the link!

Now that you've seen the boots, here's the rest of him.  Just a little more to do on him and then it will be time to tackle that base.

Tuesday, February 28, 2017

Empress' Dragoons Officer Part 3

After finishing up the Fallen Angel, I thought I'd try to finish up another old project.  The SCAHMS show (the local Los Angeles figure group) is coming up in a little over a month and I don't have anything to bring!  I've been working on a lot of pieces, but nothing is finished.  The Fallen Angel is the only piece I've completed since last year and it's already off with its new owner.  I could keep working on the Celt, but I'm not sure if I have enough time to finish it before the show.  Redghar and Count Melenth are close, but both are a bit stuck and I'm not sure I can work through them in time either.  Luckily, the Dragoon is a relatively straightforward piece and should be easy to finish off in time.  If I'm lucky, maybe I'll even have time to finish something else like the Hussar bust... but that's getting a little ahead of myself.

After dusting off the Dragoon, I started to work on his helmet.  I did the basic metal for the helmet and then started working on the leopard skin.  Although not this specific Dragoon's helmet, here is an example of a French Dragoon Officer's helmet.

Using that and some other online images as a guide, I tried to recreate the pattern on the figure.  For the background color I used Bronzed Shadow, Bronzed Skin, a 50/50 mix of Bronzed Highlight and Khaki Highlight, and finally a bit of Linen White.  For the spots I used Pure Black, Dusky Skin Shadow, Dusky Skin, and Dusky Skin highlight to do the black outsides.  I tried to vary these in shape and size, using the online references as a guide.  For the inside of the spots I used a 50/50 mix of Bronzed Shadow and Muddy Brown, and then highlighted that with Bronzed Skin.  Below is a blown up image of the mostly finished helmet.

After that I attached the red plume on his left side.  This could have been done in white (as it is on the box art), which I believe would represent the chief of staff.  But for the typical Empress' Dragoon it would have been red.  I like the extra bit of color (the other red is mainly seen from the rear of the figure), so I opted for red instead of white.

My next task was the horse hair crest.  This was done in black, much like the hair for the Fallen Angel.  I liked how the faux glossy black turned out there, so I plan to use that trick on a number of other figures!  I started by sketching in the shine and then went back to blend in to the black hair.  For this I worked with Vampiric Shadow (for the shine) and then blended to black using Dark Elf Highlight, Dark Elf Skin, and Dark Elf Shadow.

My next big task will be to do the cord/braid details.  This is supposed to be a gold lace.  In the past I've used metallic paint and metallic paint mixed with matte paint, but was never 100% happy with the results.  So this time I decided to do a NMM look for the braid.  Yes, it means I'm mixing TMM on the helmet with NMM on the braid, but they're different materials and I've already essentially done a NMM gloss finish for the horse hair crest.  I did a somewhat rough sketch on part of the cords hanging from the shoulder and am pretty happy with the result.  I did a more finished version on the tiny details on the tail of his coat.  Now I'll go back, clean up the cord and paint the rest of the gold lace.