Showing posts with label Knight. Show all posts

Wednesday, December 26, 2018

2018 Year in Review

Well, it seems like a good time to look back at all my painting related work from the past year. This year included a move to a new city, which provided a bit of a disruption from my normal hobby work. Unfortunately my new hobby space is a bit more isolated, so I'm still trying to find the balance between work, family, and painting. Of course we'll be moving to a new place (same city though) in another 3 or so months... so perhaps that setup will end up working a bit better for me. :)

There's been quite a bit of painting though, because I've got some bigger projects in the works, it hasn't resulted in that many 'finished' pieces.  Only three pieces were fully completed this year: a 28mm White Speaker (commission project), a 54mm Knight of the Third Crusade, and a 54mm dwarf (Brom from Enigma miniatures).  The White Speaker, like this post, was a trip down memory lane.  Several years ago I painted the 54mm version of that figure, so it was an interesting project to see how, with more experience, closely I could replicate that work at half the size.

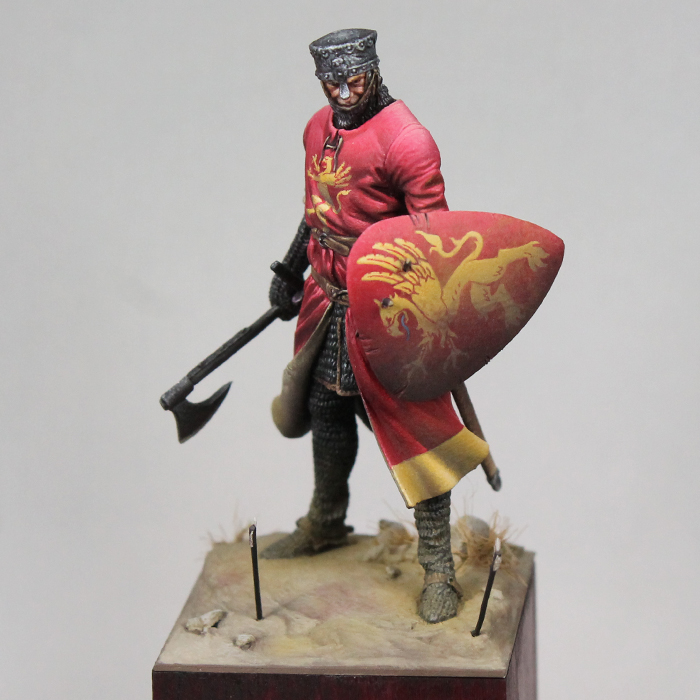
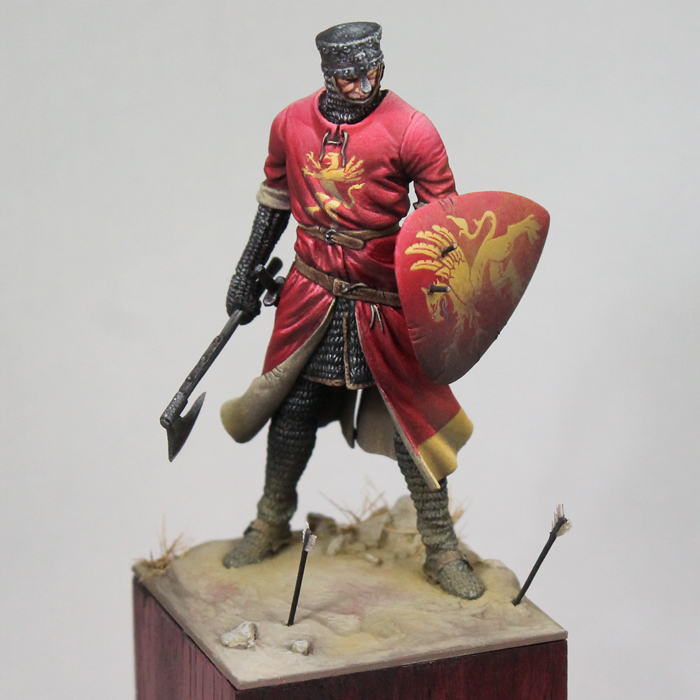
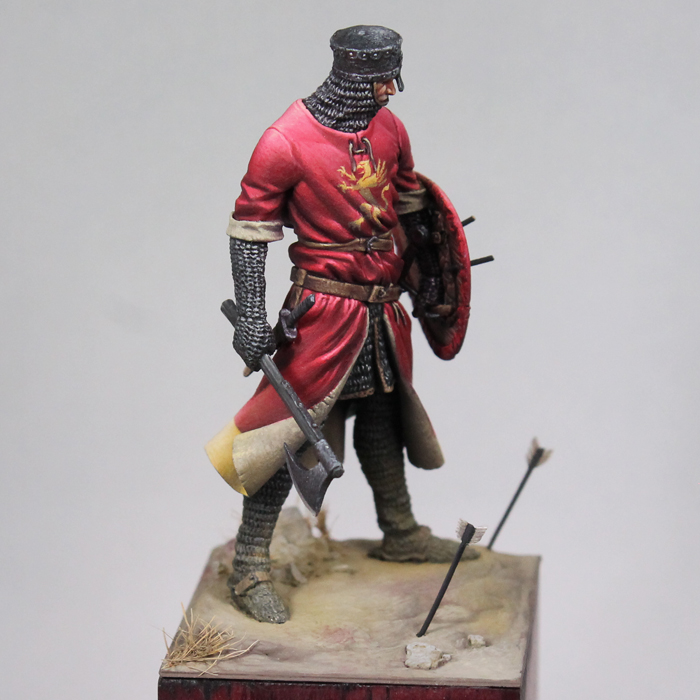
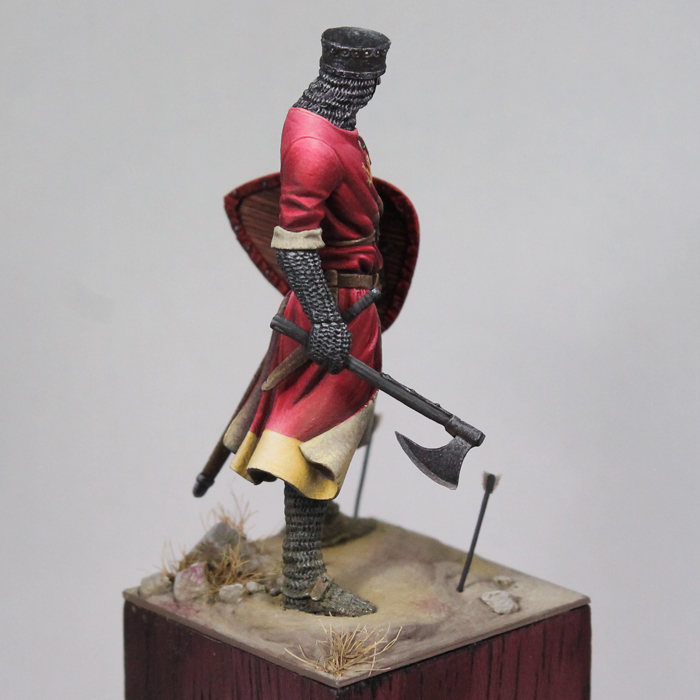
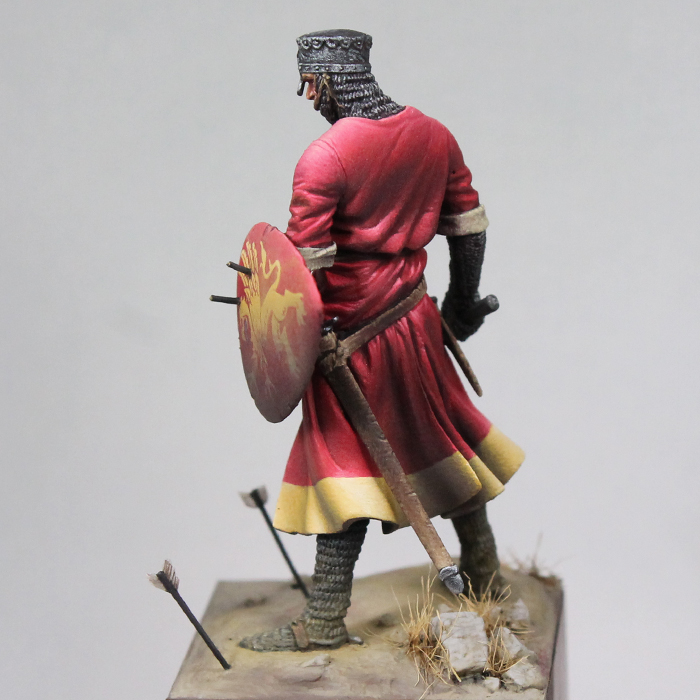
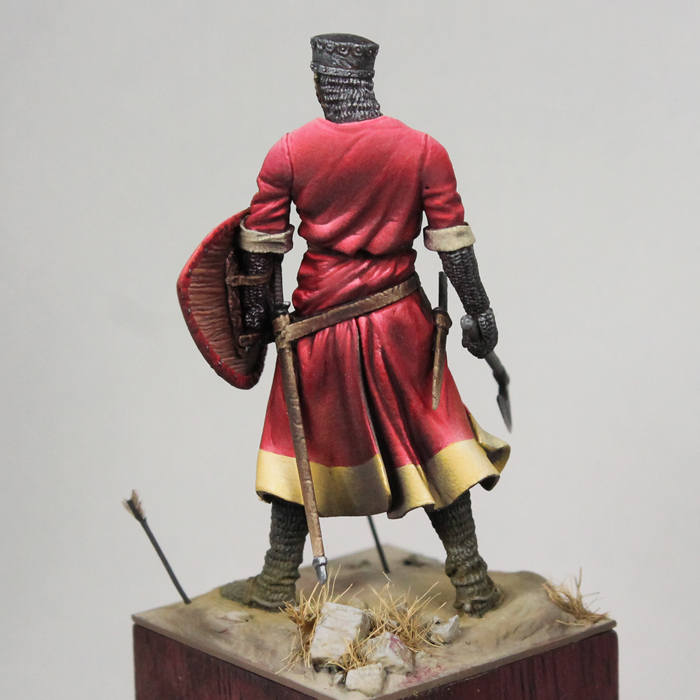
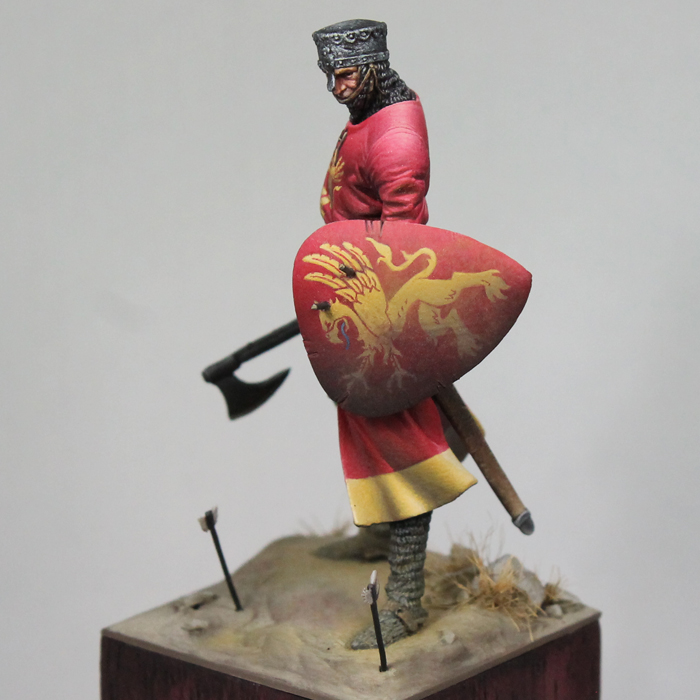
The knight was a really enjoyable project.  I'd had my eye on the kit for a while.  It's a pretty simple figure from Romeo Models, but there was something about it that just stood out to me.  There was plenty of room for interpretation and personalization with the color scheme and iconography.  The piece was also a great project to work on my metallics and my freehand.  It ended up being the subject for two articles in the Illustrated Historical Artist (one on freehand and the other on TMM) and won first place in 'Eavier Metal's 'Eadbanger competition (Master Single Figure category).

The final completed piece was Brom.  I'd wanted to do a relatively quick fantasy project, so I picked up this old 54mm Engima figure from a friend.  As usual, my 'quick' project turned into something much more involved... but it was a piece I definitely enjoyed working on.  The sculpt is pretty unusual.  The figure is wearing a hodge podge of cobbled together armor, much of it corroded.  That, along with the pose, pushed me to come up with a narrative for the figure long before I even started painting.  Although I wanted to keep this a single figure scene, I still worked to tell a story with the piece.  I actually have another article in the works describing that process, though it will likely end up posted online on the FigureMentors site as opposed to in a magazine.  So be sure to keep an eye out for it! ;)

In addition to my finished pieces, I've got a number of projects in various states of completion.  The largest of them is the 3 figure fantasy pirate diorama I've been painting for quite some time. Two of the figures, Barbarela Lord of Mussels and Redghar, were pieces I started in 2015 and 2016! I've had this idea of combining the dwarf with some other pieces, so it's been something that's evolved over time.  Between then and now, I ended up repainting most of the dwarf.  My skills had improved and the orc was noticeably better than the dwarf.  So he needed updating in order to work together.  Those two figures are essentially finished and the third, a monkey, is nearly complete as well.  The base is still under construction (though that's nearing completion), but painting the scene will still be a significant undertaking.  I'd like to take this with me to the Crystal Brush competition, so hopefully I can get it wrapped up in the next couple months!

Another big project was the 75mm Tiefling figure based on Critical Role's Mollymauk. This started out as the Child Thief (aka Peter Pan) from Terrible Kids Stuff. While a neat piece, it never inspired me as much as I wanted it to. But, when I decided to create a figure based on one of the Critical Role characters, it seemed like an ideal piece to convert. So I redid a lot of the detail on the outfit and added the horns and tailed needed to turn him into a tiefling.  It was my biggest conversion by a large margin, but only the beginning of the project.  The character is covered head to toe in design work, so there's been a ton of freehand that's gone into this project.  Still more to do, though he does appear to be nearing completion.  I've got a base already planned for him (thankfully not as complex as the pirate scene).  But it also needs to be built and painted.  I'd like to also get this piece done in time for Adepticon/Crystal Brush, so lots to do and not much time to waste!

In addition to all of those, I've worked on a 28mm figure of Vax (also a Critical Role character) released as a special edition.  It's almost finished.  Just a little work left on the wings and then a small display base to build and paint.

I also worked on a 54mm gladiator from Pegaso.  This was a kit that I've liked for quite some time, but was a bit intimidated by all the armor.  After painting the knight (shown above), I felt a lot more comfortable with my approach to TMM and decided to give the gladiator a go.  While the main figure is mostly finished, I felt he needed another figure to complete the scene.  I picked up a fallen gladiator from El Viejo Dragon, but so far have only base coated him.  Since there's no specific contest I have planned for this piece, it's taken a back seat to some other projects.  But I do hope to return and finish it up shortly after the Crystal Brush.

And finally I did some early work on a 75mm Napoleonic Trumpeteer. Pretty much just focused on the face, so he's in the very early stages.

Aside from the painting projects, I've joined up with a new painting group in San Jose (at the Game Kastle in Mountain View).  They're a great group of painters and have quite a few people who are focusing on display painting (and larger scale pieces) and pushing themselves to improve their abilities.  It's definitely been a highlight to get to interact and paint with them on a weekly basis.

Looking ahead to 2019, I've made plans to attend Adepticon after missing the last two years.  I'll be teaching two workshops on painting faces and skin plus a demonstration for freehand.  A little closer to home, I'll be repeating the faces and skin class at KublaCon in the bay area.  I've also got a weekend workshop at Game Kastle planned for July, though we are still working on the details.

All in all, it's been a productive and fun 2018.  And I'm definitely looking forward to what 2019 has to bring.  I should be able to finish off a number of big projects and I can't wait to get back to teaching some classes!  I hope all of your 2018s were just as memorable.  And I look forward to seeing what projects everyone else will be working on in the coming year.

Thursday, May 31, 2018

Knight Part 11

I needed a break from the tiefling.  It reached a stage where, though I really like the figure, I also kind of hate it.  Just feels like a slog to make any progress.  At those times, it's best to set it aside and work on something else.  So, as I peered around my painting station, I realized my crusader has been almost complete for a few months now but I hadn't actually put on the finishing touches.  No reason to delay it any longer, let's get him finished!

I had a few minor spots to paint (arrow shafts, dagger hilt, and a couple touch ups on his surcoat).  After that I started weathering him.  The scene is right at the start of a battle.  I picture him standing outside of Acre or some other fortress and the defenders have just shot their first volley of arrows.  Now the knight stands there looking back as if to say 'is that the best you can do?'  Why is that important?  Well the weathering is telling his story.  If he's at the end of a battle, he might be covered with blood splatter.  At the very least you'd expect some on his axe and shield.  But at the start, not so much.  I did add some faded blood stains though.  There's one on his shield (it's subtle, but there) and some on the ground and rocks (this is land that's been fought on again and again).

Next I went about adding dirt and dust.  This is a pretty dry climate, so no mud caked on his feet and legs.  I just used dry pigments to add a fine layer of dirt on him.  I focused on the shield and his legs.  I didn't want to overdo it on his surcoat, so I left that pretty clean.  Likely it'd be dirty too, but I'm taking some artistic license. ;)  And with that, he's done!  Here's how the final piece turned out...


Monday, March 5, 2018

Templar Sergeant Part 2 and Video Tutorials!

Over the weekend I began painting the templar and managed to record a series of video tutorials showing how I painted the face.  Doing video tutorials is definitely a learning process.  Nothing fancy here.  No editing, no time jumps, no sped up sections, etc.  Just the entire painting process from start to finish and me trying to explain it all as I go.  I broke the videos up into 6 parts covering specific sections.  All in all, painting the face took me about 2 and 1/2 hours.  But with the explanations and introductions, the total video length is 3 hours.  It's a lot to sit through.  Thankfully you can skip around and just view the parts that are most important to you.

You can find all of the videos (and all of my future ones) here.  But I have also linked all of them below.

Part 1: Prep and Sketch

Part 2: Eyes

Part 3: Shadow to Midtone

Part 4: Midtone to Highlight

Part 5: Lips and Eyebrows

Part 6: Glazing

Wednesday, February 28, 2018

Templar Sergeant Part 1

With one knight just about wrapped up, I began to prep a new one.  Seems like as I get ready to start a new project I often go through an indecisive phase.  I know any figure is likely to take me two or more months to complete (a full time job and a baby don't leave me with a ton of free time!), so I go through a variety of ideas before I find the one that really grabs me.  I enjoyed working on the knight, so I am tempted to do something similar.  I've had this kit from FER sitting next to my painting station for some time and it's one that I've been interested in painting.  Officially the kit is a Hospitaller Sergeant-at-Arms holding a cross.  First off, I like to do something different from the box art.  The figure definitely has a warrior monk feel, so I have a hard time as seeing him as anything other than one of the crusading orders.  But he doesn't have to be a Hospitaller.  I looked around a bit online for references and eventually decided to do a Templar.  I know, not the most novel choice, but it's been a long time since I painted a Templar so why not?  Plus, the figure is a sergeant, not a knight.  So instead of the traditional Templar white, he will be dressed in black with a red cross detail.

The second thing I wanted to change from the box art was the cross.  Sure, the knight will have a cross on his clothing, but holding a giant cross icon just felt like when you look at the piece it's more about religion than the knight.  So I decided to swap out the cross for a banner.  I removed the flimsy resin post he was holding and drilled through the hand so I could insert a metal rod.

Next I had to create the actual banner.  I know that's not the most complicated thing, but I haven't done much sculpting so it's a challenge for me.  I started by looking through banners in other kits I own.  I found a nice one from a 54mm mounted Pegaso knight that seemed to be the right size and shape for this knight (and the motion matching that on his clothing, similar wind state).  My initial thought was to use instant mold to do a one sided cast and create a copy.  Well, that worked horribly.  One side looked fine by the other was atrocious.  I briefly considered just using the other kit's banner here... but decided that wasn't a good idea.  The main issue is that it's a metal flag and the rod supporting it is not all that thick.  It holds, but I'm concerned it would start to bend over time.  Plus if I ever want to paint or resell the other kit, the missing banner would be an issue.  

So I moved on to a new plan: sculpt a banner from scratch.  I looked at some tutorials and settled on an approach.  I took some procreate putty and created a thin sheet between two pieces of wax paper.  Using a rolling pin I further spread it out and evened out the thickness.  Using a straight edge and a hobby knight, I cut out the shape of the banner (using the one from the kit as a guide for the size and shape).  I then began the process of carefully folding and bending the putty to create the look of a flag in the wind.  Again, I used the other banner for guidance and inspiration, though mine is not an exact copy.  Here's how it turned out:

Unfortunately on the opposite side the wax paper crinkled and stamped a texture into the banner.

I considered having another go at it, but first I wanted to see if I could salvage what I had.  I started sanding down the texture and I think the result is much improved.  I want to work on it a bit more and perhaps I'll see if I can use some more putty to fill in some areas that I haven't been able to work out with the sanding.  If all goes well, then I will be able to use this banner after all.

Here's a quick look at the banner relative to the figure.  I plan on sculpting a bit more of the banner where it connects up to the pole and will embed the rod at that point to get it on there nice and secure.

I haven't decided on the setting for the figure yet, though I am currently brainstorming ideas.  I doubt there will be much narrative to the base.  But the box art has him weathered (dirt and blood) which I like.  So I'm thinking a post battle scene.  However will it be in a castle, on regular dirt, in a ruin, etc?  Ideally I'll come to a decision before I start painting... but in this case I don't think that is as critical as if I planned a scene for the figure and base told more of a story.

Monday, February 26, 2018

Knight Part 10

Having wrapped up the White Speaker project, I spent some time trying to get the knight finished up too.  I'm not quite there, but he's getting very close.  This weekend I spend time working on his base.  I'm picturing him somewhere in Outremer, so I went with a rather dry looking base without much plant life.  I put a bit of dried grass in among the stones, but I still need to clean it up a bit and then use some washes or pigments to give it some color variation and tie it into the base.


There are a few other details I need to wrap up.  One of them is the arrows.  I planned to have two stuck in the ground and another two on his shield.  I figure for the arrows in the shield, he would have snapped those off, so they will just be stubs with the other half lying on the ground near his feet.  So this brings us to the question of how do I make miniature arrows?  Well, I'd already found some brass rod at about the right thickness.  But I still needed to make the fletching, the feathers on the arrows.  For this I remembered reading an article over on MassiveVoodoo about using real feathers on miniatures.  Turns out it was authored by Matt DiPietro.  In it one of the applications is feathers for arrows.  I mostly followed that tutorial, though I made a few minor changes.

To start, I got a bag of feathers from a local arts and crafts store.  Now, in Matt's approach, he clips off a section of the feathers shaft and glues that to the arrow.  I just clipped a portion of the outer section and was careful to hold it together while attaching it to the arrow (first image below).  To attach, I took the end of the brass rod and rolled it in glue.  Then I carefully placed it against the edge of the feather section I'd clipped off (second image below).  These pieces are intentionally too large so it'd be easier to hold them.  Once they dried, I went in with a small scissors and clipped them down to size (third image below).


The process requires some finesse.  I managed to screw it up a couple times.  But, easy to just scrape the feather off the arrow and clip a new section.  Take your time and be gentle as you clip the feather ends down to size.  So far I've got the one down and another half finished.  I still need to do the two ends from the shield, but I'm getting a better handle on this as I do more and more of them.  Once those are complete, I'll go in and paint the shafts.

Wednesday, January 24, 2018

Brushstrokes and Video


Not exactly new work, but I thought I'd post a couple super large images of Redghar.  These are the raw images from the camera (just cropped).  As I was in the earlier stages of my painting journey, there were times when I really wanted to get a closer look at the painted figures I saw online.  But you can only zoom in so much, I had a hard time seeing the details I wanted.  So every so often I like to share the full images from my figures.  The point I want to try and convey at the moment is that there's a place for smooth transitions and there's a place for rough transitions.

There are times when you'll be trying to push the contrast on your figures but, because you are concerned with smooth transitions, you are forced to hold back on that contrast.  While there are places where you really do want smooth transitions (like large surfaces without any rapid changes in shape), there are other places where you should just say 'screw it'.  What you should be concerned with is the overall effect.  And, there are times, when dramatic contrast makes a better effect than subtle contrast with smoother blends.

I feel like Redghar is a figure that has both.  Especially on regions like the face and leather, contrast has been preferred over super smooth transitions.  If you're curious, you can click on any of the images below for the full-sized version and take a closer look at the details of the paint application on the figure.


In addition to that, I've been playing around with my camera.  I hope to start making some video tutorials, though the first attempt did not work so well.  Last night I took a short video (no sound) just showing the figure from various angles.  I always share still images, but perhaps seeing a moving version of the figure is a little closer to actually viewing it in person.  This is also a bit of a test for how the blogger site deals with video. :)


And here's one of the knight too


The videos have also been posted to youtube.  Here's Redghar: https://www.youtube.com/watch?v=6VzzOfUfiJ0
And here's the knight: https://www.youtube.com/watch?v=vKfW6HW9gAA

Thursday, January 11, 2018

Redghar Part 7 and Knight Part 9

I haven't made much progress on any single project in the past week, but I have done a little bit here and there.  I decided to take a crack at painting some dark metal on Redghar for the pistol barrels and the either cannon balls or bombs on his belt.  It basically involved using a lot of matte black mixed into the metal, then more metallic and a bit of a matte highlight color to create the shine points.  The idea is trying to force the dark areas to stay dark and limit the light/reflective spots.
Really not much left to do on him.  I have the feeling the chains on the anchor and around his neck will take me a bit, but the knee patch (once I figure out the color) and the arm band should be quick enough to do.

In addition, I did some glazing on the knight.  Mostly I focused on the face, now that I've gotten the areas around it painted.  I also did some glazing on the armor and the surcoat, but the effects there are very subtle and not easy to pick out from the photo.

And here's a close up comparison of what difference the glazes make.